Hello quilting friends!
If you’ve finished piecing your Greenhouse Garden quilt top (or getting close to finishing), you might be wondering: How should I quilt it? Today, I’m sharing my approach to quilting my Greenhouse Garden quilts and offering tips to inspire your own quilting plan.

Whether you’re a seasoned quilter or new to walking foot quilting, you’ll find these ideas helpful for creating a design that enhances the beauty of your quilt. If you haven’t started your Greenhouse Garden quilt yet, grab the pattern bundle here and join the fun!

Planning Your Quilting Design
There are so many ways to quilt your Greenhouse Garden, from free motion quilting, to longarm quilting, to hand quilting, but my favorite is walking foot quilting. I love quilting with my walking foot. When quilting with a walking foot the possibilities are endless. You can explore straight lines, gentle curves, and echo quilting to add depth and texture to your quilt.

Why I Love Walking Foot Quilting
Walking foot quilting is my favorite way to quilt and here are just some of the reasons why:
• Stitch Consistency: The walking foot ensures even stitches since it works with your machine to feed the quilt layers evenly.
• Simplicity: Unlike free-motion quilting, you don’t need a stitch regulator or to worry about moving the quilt at a consistent speed.
• Precision: The walking foot lets me focus on guiding the quilt under the needle, helping me achieve crisp, clean lines.
Let’s Get into How I Decided to Quilt my Greenhouse Gardens:
Strategy 1: Let the Design of your Quilt Top Guide You

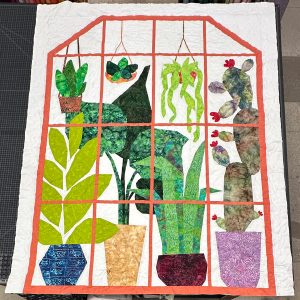
The Greenhouse Garden quilt’s shapes—leaves, stems, flowers, and pots—are perfect for quilting inspiration. For my quilts, I started in the center of the quilt and worked outward to the edges of the quilt.
First I quilted inside each shape with complementary thread colors. (More on this below!)
Then, I quilted inside each shape, echoing the outline. Most lines were ¼” apart but for some areas I decided to go a bit denser with quilted lines only ⅛” apart.
For the background, I first quilted diagonal straight lines, ½” apart, to create an effect of beams of light, giving the quilt a radiant touch. Then I quilted just outside each leaf, flower, and pot shape using a complementary thread color to give additional definition of the main garden elements in the quilt.

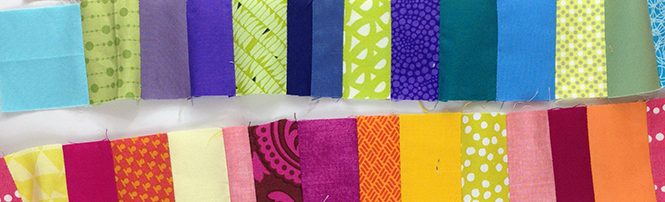
Strategy 2: Choosing Your Threads
Thread weight and color can play a big role in bringing your quilt to life. I used a mix of Aurifil 50 weight, 40 weight, and 28 weight threads to add dimension and texture. Be sure to check out my blog post to learn a bit more about thread weights. Here’s a closer look at my thread choices:


THREADS I USED FOR MY THROW VERSION (CHALK & CHARCOAL FABRICS):
Here are the threads I selected to quilt my Throw Version without mullions (sashing) made with Chalk & Charcoal Fabrics by Jennifer Sampou for Robert Kaufman Fabrics.
Plants: Aurifil 40wt in greens (colors: 2886, 2840, 2870, 2892, 2860, 2887)
Pots and Flowers: Aurifil 50wt in warm tones (colors: 1243, 2150, 2250, 2435)
Background: Aurifil 28wt (color: 2021)


THREADS I USED FOR MY QUEEN VERSION (GRUNGE FABRICS):
Here are the threads I selected to quilt my Queen Version with mullions (sashing) and add-on Greenhouse Garden blocks (top) made with Grunge Fabric by Moda Fabrics
Plants: Aurifil 40wt in greens (colors: 1231, 2840, 1114, 2870, 2850, 2890)
Pots and Flowers: Aurifil 50wt in warm tones (colors: 2588, 2145, 4020, 2440)
Background: Aurifil 50wt (color: 4140)
Mullions (Sashing): Aurifil 40wt in gray (color: 2606)
Strategy 3: Experiment with Stitch Length
For my Greenhouse Garden quilts, I used a stitch length of 3.3 mm. While experimenting on a test block using this stitch length, I discovered I could stay inside the shapes I was outlining and echoing. I like the look of longer stitches, but to me this length felt proportional to the size of the shapes and quilt.
Play around with stitch lengths and see what looks good to you and what feels right.

Tips for Successful Walking Foot Quilting
1. Start in the Middle: Begin quilting in the quilt’s center and work outward to the edges. This will allow you to smooth out the three layers of your quilt sandwich as you quilt.
2. Baste Well: A well-basted quilt is key to smooth quilting. There are many types of way to baste a quilt. Curious about how I like to baste my quilts? Check out my tutorial here.
3. Take a Test Drive Before Diving Into: Test stitch length, tension, and thread combinations on a spare quilt sandwich before starting.
4. Mark Guidelines: Use a hera marker (my preferred way to mark), masking tape, or chalk to mark quilting lines as needed.
5. Go Slow: I find I get the best results with my Walking Foot Quilting when I set my machine on a slower setting. Take your time and enjoy the process.
Maker Showcase
Check Out How Others Quilted Their Greenhouse Garden Quilts:


Want to Make Your Own Greenhouse Garden Quilt?
If you haven’t started your Greenhouse Garden quilt yet, it’s not too late! Get the Greenhouse Garden Quilt Pattern Bundle here. and join a community of quilters who are making their own beautiful garden-themed quilt to keep for themselves or give as a gift.
Ready to Quilt Your Greenhouse Garden?
I hope these tips inspire you to experiment with quilting your Greenhouse Garden quilt! Whether you’re trying new thread colors, echo quilting, or diagonal lines, or a completely different quilting strategy, the results will be uniquely yours.
Happy quilting!
Sheri